Dynamically creating tiles - GBDK
How does a Tile work
THIS TUTORIAL USES GBDK & GBTD
To generate a tyle you can call a DMA method to write from cpu and ram to the VRAM. in GBDK it's your standard "set_?_data" types that handle these actions. I personally used the "set_bkg_data" as these are not limited like sprites are, allowing you to create a full scene of animated objects and graphics to your hearts content. And possibly overlay these with sprites as "UI" elements or additional game elements.
To find out how to write a tile you can create tests using the GameBoy Tile Designer, and creating a drawing like this to find out how these are tiles are set up. (Export as .C for GameBoy/GBDK)
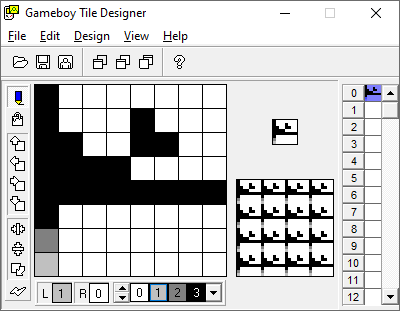
//the code will look something like this
unsigned char TileLabel[] = {
    0x80,0x80,0x88,0x88,0xCC,0xCC,0xF0,0xF0,
    0xFF,0xFF,0x80,0x80,0x00,0x80,0x80,0x00
};
//let simplify this by making pairs of 2 and add a row number to each row.
unsigned char TileLabel[] = {
    0x80,0x80, //y1
    0x88,0x88, //y2
    0xCC,0xCC, //y3
    0xF0,0xF0, //y4
    0xFF,0xFF, //y5
    0x80,0x80, //y6
    0x00,0x80, //y7
    0x80,0x00  //y8
};
Notice how a tile is 8 rows long and 2 bytes wide (2bytes = 16 bits), which doesn't match 8 pixels wide. Take a look at row 7, 8 and 1 in this order.
// y7 = bytes[] { 0x00, 0x80 } = light gray
// y8 = bytes[] { 0x80, 0x00 } = dark gray
// y1 = bytes[] { 0x80, 0x80 } = black
So to create a black pixel both bytes need to be set the same. But how do we know which pixel is what. The trick is using the bits from a byte as 1 byte = 8 bits. The pixels are directly correlated with these.
see as y1 = uses { 0x80, 0x80 } if you only focus on 0x80 and convert it to binary it is equal to "1000 0000"
y2 uses { 0x88, 0x88 } which in binary is equal to { "1000 1000", "1000 1000" }
y5 is a full black row of pixels { 0xFF, 0xFF } is equal to { "1111 1111", "1111 1111" }
now if I want a full LIGHT gray row in binary you would write { "0000 0000", "1111 1111"} in bytes this would be { 0x00, 0xFF }
similarly a full DARK gray row in binary you would write { "1111 1111", "0000 0000"} in bytes this would be { 0xFF, 0x00 }
Generating a Tile in Code
THIS TUTORIAL USES GBDK, recommended to test the game with BGB
Now we know how to formulate and manually write/design a single tile, let's create one fast and efficiently in code. To start off, copy a (bare-minimum) example project, open main.c and create the following global varriables:
- array named vramData with one tile's worth of bytes (16 bytes)
- array named vramTiles with 1 tile description;
- single x var.
- single tileBase var.
- single tileOffset var.
unsigned char vramData[] = {
    0x00,0x00,0x00,0x00,0x00,0x00,0x00,0x00,
    0x00,0x00,0x00,0x00,0x00,0x00,0x00,0x00
};
unsigned char vramTiles[] = {
    0xFF //last vram tile
};
UINT8 x = 0x00;
UINT8 baseTile = 0x40; //will be used for setting the standard vram position
UINT8 offsetTile = 0x00; //will be used for multiple tiles
This is the one tile to rule them all, you don't need any additional array's for multiple tiles. To go about rendering create a method named computeTile here we will for simplification write all bytes manually (you can replace this with for loops or your own implementation later). We will however loop over the X value; This will generate a vertical line that fills up the space.
void computeTile()
{
    vramData[0x00 + 0x00] |= 0x01 << 7 - x;
    vramData[0x00 + 0x01] |= 0x01 << 7 - x;
    vramData[0x0 + 0x00] |= 0x01 << 7 - x; //y1
    vramData[0x0 + 0x01] |= 0x01 << 7 - x;
    vramData[0x2 + 0x00] |= 0x01 << 7 - x; //y2
    vramData[0x2 + 0x01] |= 0x01 << 7 - x;
    vramData[0x4 + 0x00] |= 0x01 << 7 - x; //y3
    vramData[0x4 + 0x01] |= 0x01 << 7 - x;
    vramData[0x6 + 0x00] |= 0x01 << 7 - x; //y4
    vramData[0x6 + 0x01] |= 0x01 << 7 - x;
    vramData[0x8 + 0x00] |= 0x01 << 7 - x; //y5
    vramData[0x8 + 0x01] |= 0x01 << 7 - x;
    vramData[0xA + 0x00] |= 0x01 << 7 - x; //y6
    vramData[0xA + 0x01] |= 0x01 << 7 - x;
    vramData[0xC + 0x00] |= 0x01 << 7 - x; //y7
    vramData[0xC + 0x01] |= 0x01 << 7 - x;
    vramData[0xE + 0x00] |= 0x01 << 7 - x; //y8
    vramData[0xE + 0x01] |= 0x01 << 7 - x;
    set_bkg_data(tileBase + offsetTile, 1, vramData);
}
void main(void){
    //...all in main
    // Game main loop processing goes here

    computeTile();
    x++;
    if(x >= 8){
        vramTiles[offsetTile] = baseTile; //set the current tileset
        set_bkg_tiles(37, 35, 1, 1, vramTiles); //posX, posY, tileWidth 1, tileHeight 1, tileSet
        //to make it flicker
        UINT8 clearVRAMI;
        for(clearVRAMI = 0x00; clearVRAMI < 0xFF; clearVRAMI++){
            vramData[clearVRAMI] = 0x00;
        }
        x = 0x00;
    }
    offsetTile = 0x00;
}
Leave a comment
Log in with itch.io to leave a comment.